

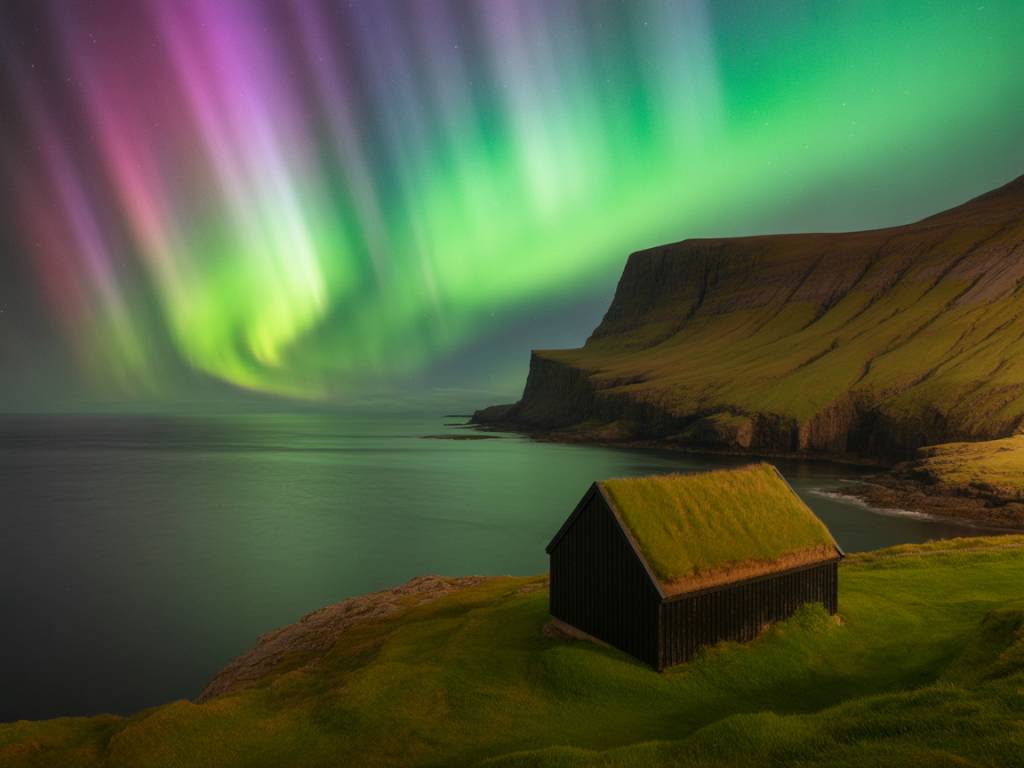
Why the Faroe Islands are a serious northern lights destination
The Faroe Islands don’t show up in the usual “top 5 aurora spots” lists, and that’s exactly why they deserve your attention. Geographically, they sit at about 62°N, roughly the same latitude as southern Iceland and just slightly south of Tromsø. In terms of pure auroral potential, that’s a strong starting point.
The challenge is not the latitude, but the weather. The Faroes sit in the North Atlantic, directly under an active storm track. Cloud cover is frequent, wind is often strong, and clear-sky windows can be short. If you accept that and prepare for it, the islands can reward you with bright auroras, minimal light pollution and dramatic coastal scenery that makes even a modest KP storm look spectacular.
This guide is written to reduce guesswork: when to come, what KP index you need, how to read the local weather, and where to go on the main islands when the forecast finally lines up.
When to see northern lights in the Faroe Islands
Northern lights are possible any time it’s dark enough, but if vous plan a trip just for auroras, some periods are much more efficient than others.
Season:
- Best months: Late September to early April
- Peak sweet spot: Mid-October to mid-March
In late August and early September, nights are still short and often not fully dark. From late September onwards you get proper astronomical night and more hours for aurora hunting. By April, the nights shorten again and your window shrinks.
Time of night:
- Typical active window: 21:00–01:00
- Extended window on strong storms: 19:00–03:00
You can occasionally get bright aurora as early as 19:00 on strong nights, especially in mid-winter when it’s dark early. If you’re tired, prioritise the 21:00–23:30 slot: that’s often where the best combination of darkness and geomagnetic activity sits.
What KP index do you need in the Faroe Islands?
On most aurora maps, the Faroes lie between the “KP 2 belt” and the “KP 3 belt”. In practical terms:
- KP 1–2: Weak, low auroras possible, mostly low on the northern horizon. You might see a faint arc or a grayish glow with the naked eye under very dark skies.
- KP 3: Good threshold for the Faroes. Aurora often visible to the eye, rising higher in the sky. This is the level where it starts getting interesting for casual observers.
- KP 4–5: Very good conditions. Expect clear structures (arcs, bands, sometimes coronas) overhead or south of zenith. These are the “memorable night” levels.
- KP 6+: Major storm. If the sky is clear and you’re away from city lights, the whole sky can light up. These events are less frequent but not rare over a season.
Because the weather is the main limiting factor in the Faroe Islands, my rule of thumb there is simple: don’t obsess over “perfect” KP. If you get anything from KP 3 and up + at least a few hours of partial clearing in the forecast, you go out. You can’t afford to “wait for KP 5” and skip marginal clear nights in this climate.
Weather and cloud cover: the real boss of your trip
The number one source of stress for aurora travelers in the Faroe Islands is clouds, not geomagnetic activity. The islands are small, but relief is rugged and local conditions can differ a lot between fjords, coast, and high plateaus.
What to look at in the forecast:
- Low cloud cover: This is your main enemy. Even if high clouds are present, many cameras and eyes will still pick up aurora through thin layers. Dense low stratus is what cancels your show.
- Wind direction and speed: Strong winds from one direction can create foehn-like clearings in the lee of mountains. Sometimes a 10–15 minute drive across a pass is enough to move from thick cloud to starry gaps.
- Showers vs large fronts: A night with scattered showers can actually be great: you get fast-moving cloud gaps and occasional clear windows. A night under a solid, slow-moving frontal band is usually a write-off.
Practical strategy on site:
- Stay mobile: Don’t lock yourself into a single spot for the whole night. Plan 2–3 candidate areas within 30–40 minutes’ drive.
- Use altitude wisely: Higher viewpoints sometimes poke above low valley fog, but in the Faroes, high ground is often in the cloud. If the cloud base is low, try to climb; if the whole island is in the cloud cap, stay lower and move along the coast.
- Watch the live sky, not just apps: If you see a belt of clearer sky on the northern horizon and the wind is bringing it toward you, wait. If everything is a uniform gray, be ready to drive along the coast in the upwind direction to search for breaks.
Best base towns for aurora hunting in the Faroe Islands
Most travelers will base themselves near Tórshavn or Klaksvík, then radiate outward by car. That’s a good approach, because you’ll need flexibility and services (fuel, food, safe accommodation) more than “perfect darkness” directly in town.
Aurora hunting from Tórshavn
Tórshavn is the practical hub of the islands: ferries, main roads, services. Light pollution is moderate by European standards, but enough that you’ll want to move 10–20 minutes out of town for serious sky watching.
Why Tórshavn works:
- Fast access to multiple directions: north toward Kaldbak and Kollafjørður, west toward Velbastaður and Kirkjubøur, east via the Eysturoy tunnel.
- Plenty of short, safe drives: you don’t have to tackle remote roads in bad weather to escape light pollution.
Suggested spots around Tórshavn:
- Kirkjubøur coast: About 15–20 minutes from Tórshavn by car. Historic village, relatively open views to the west and northwest. Park near the church or along the road in designated places, making sure you’re not blocking driveways or farm access. Good when the northern sky is clearer.
- Velbastaður viewpoints: Short drive west. Look for lay-bys where you can safely pull over without blocking traffic. Nice open views toward the islands to the west. Great for wide-angle aurora panoramas with sea and islands in the foreground.
- Kaldbaksbotnur area: Head northeast out of Tórshavn. The fjord here gives you views mainly to the south and north along the water. Low light pollution once you’re outside the village itself. Good fallback if western and southern skies are cloudy but the north opens up.
In all these spots, avoid parking in the middle of narrow roads; use proper lay-bys, and keep headlights off or on low beams once parked to preserve night vision (yours and other observers’).
Aurora hunting from Klaksvík and the northern islands
Klaksvík, on Borðoy, is another very solid base. It has less light pollution than Tórshavn but still enough services to make life easy: supermarket, fuel, a range of accommodations.
Advantages of Klaksvík:
- Faster access to the more remote and photogenic islands (Viðoy, Kunoy, Kalsoy via ferry).
- Good 360° sky visibility from short drives out of town.
Suggested spots from Klaksvík:
- Kunoy village: About 20 minutes by car. The village itself is small, and light pollution is minimal. You get strong north-facing views along the fjord. Park in obvious parking areas in the village, not in front of houses or on grass verges.
- Viðareiði area: At the northern end of Viðoy, often described as one of the most scenic places in the Faroes. When the sky clears, the combination of sea, cliffs and aurora can be spectacular. Be very cautious in strong winds: exposed roads and edges.
- Roads around Árnafjørður: This small fiord between Borðoy and Viðoy offers some pull-offs with good views north and west. Handy for quick stops if the KP suddenly spikes.
How to stay safe while chasing auroras in the Faroes
The Faroe Islands combine darkness, wet roads, strong winds and steep drops. That’s a mix you must respect, especially at night when you’re tempted to focus only on the sky.
Key safety rules:
- Stay off cliff edges in the dark: Many famous viewpoints (e.g., around Viðareiði or Kalsoy) have unprotected drops. At night, do not “explore” unfamiliar cliff areas under aurora. Pick viewpoints you’ve seen in daylight or that are clearly fenced / well away from edges.
- Mind wind speeds: Gusts above 20–25 m/s can make it hard to even open car doors, let alone stand with a tripod. In such conditions, favour sheltered fjords, not exposed headlands.
- Use official parking only: Park in marked lots or obvious gravel lay-bys. Many fields are private and wet; it’s easy to get a vehicle stuck or damage turf.
- Layer up and stay dry: Winds and showers can make the apparent temperature much lower than the air temperature. Use windproof shell layers, waterproof boots and gloves that you can still operate a camera with.
Gear checklist specifically for the Faroe Islands
Beyond the classic aurora gear, a few items become very useful in this environment.
- Sturdy tripod with a solid ball head: Cheap, light tripods will shake in Faroe winds. Prioritise stability.
- Wide, bright lens: For cameras, aim for a lens in the 14–24 mm range (full-frame) with f/2.8 or faster. The aurora here can be bright but cloud breaks may be short; you want to capture as much light as possible quickly.
- Headlamp with red light mode: White light ruins night vision and annoys others. Red mode lets you move around without losing your eyes’ adaptation.
- Paper or offline maps: Mobile coverage is decent on main routes but can drop in remote fjords and tunnels. Have a backup map and pre-saved locations.
- Microspikes in winter: In colder spells, roadsides and paths can be icy. Simple slip-on spikes make a big difference around parking areas and short walks.
Planning your nights: a simple decision framework
To keep “forecast stress” low, I use a basic three-step check each afternoon:
- 1. Is the geomagnetic activity promising? Check KP forecasts and, closer to nightfall, real-time data (especially Bz and solar wind speed). If the predicted KP is 3+ for at least a few hours, I tag the night as “go if clouds cooperate”.
- 2. Where might I find clear sky? Look at cloud cover maps for low and mid-level clouds. Note which coast or fjord seems most likely to clear between 21:00 and 01:00. Pick one primary area and one backup within a 30–45 minute drive.
- 3. How much risk do I accept on the road? If wind warnings or heavy showers are active, I choose routes with fewer hairpin bends and lower exposure. In the Faroes, sometimes the smartest call is to stay close to town and accept a bit more light pollution.
With this, you avoid the paralysis of having too many options and too many maps open. You decide early, then adapt only if conditions clearly change.
Realistic expectations: how many aurora nights can you get?
Over a one-week winter trip in the Faroe Islands, what’s a reasonable expectation if your main goal is the northern lights?
- Statistically likely: 1–3 nights with at least partial clearings and some visible aurora, if you are flexible and ready to drive.
- Possible with luck: 3–5 “usable” nights with some level of aurora activity.
- Also possible: A full week where clouds win most nights, even if the Sun is active. That’s the nature of the North Atlantic.
This is why I recommend treating auroras as one strong reason to visit the Faroes, but not the only one. Island-hopping, hiking (in daylight), bird cliffs in shoulder seasons, and simply watching the ocean in stormy conditions are experiences that fill the “non-aurora” nights and reduce frustration if the sky refuses to cooperate.
Faroe Islands vs Iceland or Tromsø for northern lights
If you’re still at the planning stage and wondering whether to pick the Faroe Islands at all, here’s a quick, practical comparison for aurora-focused trips:
- Latitude: Similar to southern Iceland, a bit south of Tromsø. All three give you frequent auroras over a winter season.
- Weather:
- Faroe Islands: Very changeable, frequent cloud, strong winds; small landmass means quick access to different coasts.
- Iceland: Also volatile, but with larger inland areas where different air masses compete—sometimes easier to drive “out of” bad weather by going inland.
- Tromsø region: More continental influence inland toward Finland, often giving more stable clear nights when you’re willing to drive a few hours east.
- Light pollution and crowds:
- Faroe Islands: Least crowded, fewer light domes, but also fewer roads and fewer “backup” regions.
- Iceland & Tromsø: More infrastructure, more tour options, but also more people and more traffic at popular spots.
If your top priority is maximising the probability of clear skies and multiple strong aurora nights, Tromsø + inland Norway/Finland usually wins. If you want a wilder, more intimate feel with dramatic ocean landscapes—and you accept a higher weather risk—the Faroe Islands offer something quite different.
Sample 3-night aurora plan from Tórshavn
To make all of this more concrete, here’s how I’d structure three nights based around Tórshavn in mid-winter, assuming a rental car and flexible timing.
- Night 1: “Local get-to-know-the-roads” night Even if the forecast is average, use your first clear-ish evening to:
- Drive to Kirkjubøur and Velbastaður in daylight or early dusk.
- Identify safe parking areas and potential foregrounds (church, old houses, coastline).
- Stay out until 23:00—if aurora appears, great; if not, you’ve scouted your main spots without pressure.
- Night 2: “Chase the break” night If the forecast shows partial clearing in one direction:
- Pick either the west coast (Velbastaður, further toward Sandavágur) or the north (Kaldbaksbotnur side) depending on cloud maps.
- Leave Tórshavn around 21:00, be in position by 21:30–22:00.
- Give each location 45–60 minutes. If clouds solidify, move to your backup.
- Night 3: “All-in” night If KP is 4+ and clouds look manageable:
- Be ready early—already parked by 20:30 if it’s dark.
- Commit to your best spot (for example, a coastal viewpoint with a wide view north and west) and stay at least until 01:00.
- Have a thermos, warm layers and a simple rule: no checking accommodation websites at midnight; you stay for the main window unless the sky is clearly gone.
With this kind of structure, you give yourself a realistic chance to catch whatever the sky offers, while staying safe and keeping forecast anxiety under control. In the Faroe Islands, that’s the balance you’re aiming for: respect the weather, stay mobile, and grab every clear gap the Atlantic gives you.