Why staying warm matters more than KP index
Most aurora trips near a city fail for a very simple reason: people give up because they’re cold, long before the northern lights show up.
You can have a KP 6, clear skies and a perfect dark spot 30 minutes from town. If you’re shivering after 25 minutes, you’ll likely retreat to the car or back home just before the main burst hits.
This guide focuses on one thing: how to stay warm, comfortable and mentally fresh during long aurora waits near your city. Think of it as your “cold-weather buffer” – the extra two hours you can hold on, when others crack.
Start with a realistic plan, not a fantasy
Before packing socks and hand warmers, decide what kind of night you’re planning:
- Short city escape (1–2 hours): Quick drive to a nearby dark spot, maybe back home by midnight.
- Half-night session (3–5 hours): Serious attempt with flexible timing, maybe multiple spots.
- Full-nighter (6+ hours): Aurora chase mode, often with naps in the car between activity peaks.
The colder it is and the longer you stay, the more your gear and routine matter. Check:
- Temperature and wind: -5°C and calm can feel easier than +1°C with strong wind and humidity.
- Cloud cover timing: If your window is 23:00–01:00, you don’t need to dress for a 9-hour arctic expedition.
- Access to your car or indoors: Huge difference between standing on an exposed jetty and being 20 meters from a warm vehicle.
Then, decide in advance: “Tonight, I’m prepared to stay outside at least from [time] to [time].” That mental commitment helps you dress properly and avoid giving up too early “just because it feels cold”.
Dressing strategy: trap heat, don’t chase it
To stay warm, you don’t need a fancy expedition suit. You need a system that traps your body heat and keeps moisture away from your skin. Think in three layers:
- Base layer (next to skin): Thin, breathable, no cotton.
- Mid layer (insulation): Fleece, wool, light down or synthetic jacket.
- Outer layer (shell): Windproof, ideally water-resistant.
Here’s a city-friendly setup that works from about 0°C down to -15°C, depending on your own tolerance:
- On top:
- Base: Long-sleeve merino or synthetic thermal shirt.
- Mid: Fleece jacket or thick wool sweater.
- Extra: Light down or synthetic jacket if you run cold.
- Shell: Windproof jacket or parka with hood.
- On legs:
- Base: Thermal leggings (merino or synthetic).
- Outer: Lined winter trousers, ski pants or windproof hiking pants.
- Tip: If you only have jeans, wear thermals under them and add a windproof shell if possible. Denim alone is a cold sponge.
- On feet:
- Thick wool socks (avoid tight elastic that cuts circulation).
- Winter boots with space around toes (air gap = insulation).
- Removable insoles help if the ground is frozen.
- On hands:
- Thin liner gloves (touchscreen-friendly if you use your phone/camera).
- Over-mittens or thick gloves as the main insulation.
- Hand warmers in your mittens for long static waits.
- On head and neck:
- Warm beanie that covers ears.
- Neck gaiter or buff (much more flexible than a big scarf).
- Hood as an extra wind barrier when needed.
The idea: you can always open zips or remove one layer if you need to move or drive, but you can’t magically create insulation you didn’t bring.
Feet, hands, face: the usual points of failure
Most people give up because of cold extremities, not because their jacket is too thin. A few simple rules help a lot:
- Feet:
- Never start your night with slightly damp socks from earlier in the day – change into fresh ones before leaving.
- Don’t overtighten boots; tight equals cold.
- Use a small foam mat or folded blanket to stand on if you’re on ice, metal or concrete.
- Hands:
- Keep your liner gloves on almost all the time; remove the outer mittens only briefly for phone or camera work.
- Rotate your hands into pockets with warmers when you’re just standing and watching.
- Face:
- Use a buff you can pull up over nose and cheeks in wind gusts.
- If you wear glasses, keep your nose and mouth outside the buff when possible to reduce fogging.
A five-euro foam pad and a pair of liner gloves can easily add an extra hour to your comfortable viewing time.
Use your car as a mobile basecamp, not a prison
Near cities, your car is your best winter shelter. But sitting with the heater on full blast for three hours is not the best strategy, and it can be unsafe if you’re idling on packed snow or soft ground.
Instead, use your car as a controlled “warm box” between outdoor sessions:
- Park smart:
- Choose a legal, safe spot with a clear northern view or a short walk to one.
- Avoid deep snow banks and areas where your exhaust might be blocked.
- Heat cycles:
- Warm the car fully before you get out for a long viewing period.
- Turn the engine off while you’re outside or napping briefly. Restart only when you need another warm-up cycle.
- If it’s very cold, short warm-up breaks every 45–60 minutes can keep you comfortable without staying stuck inside.
- Use the car interior well:
- Keep a dry backup layer (socks, gloves, sweater) in a bag inside the car.
- Store your hot drinks in the cabin, not the trunk, to reduce heat loss.
- If you’re with others, rotate who stays outside and who “recharges” inside.
Think of each outing from the car as a 15–30 minute “mission”: scan the sky, check activity, take photos, and return to warm up if the cold starts to bite.
Hot drinks and smart snacks: low-tech heat boosters
Food and drinks are not a luxury on aurora nights; they’re part of your temperature control.
Drinks:
- Bring at least one thermos with a hot drink (tea, herbal tea, broth or coffee if it doesn’t mess with your sleep).
- Small sips every 15–20 minutes are better than chugging one big mug and then nothing for two hours.
- Avoid only drinking ice-cold water; if you bring water, keep it insulated or slightly warm.
Food:
- Go for slow energy and easy-to-eat options: nuts, trail mix, chocolate, cheese, sandwiches, energy bars.
- Eat before you feel chilled. A small snack each hour keeps your body “fuelled” for heat production.
- Avoid going out with an empty stomach; cold burns energy quick.
Just knowing there is hot tea and chocolate in the car makes the long stretch between 01:00 and 03:00 a lot more manageable.
Move just enough: warm without sweating
Waiting for auroras is usually very static: standing, staring north, occasionally checking your phone. That’s an efficient way to get cold.
You don’t need a gym session. You just need regular, gentle movement that doesn’t cause sweat:
- Every 10–15 minutes, do a quick “warm-up circuit”:
- Slow walks or small laps around your viewing spot.
- Light knee lifts, ankle circles, arm swings.
- Short stretches to keep shoulders and back loose.
- If you feel a sweat coming on, slow down immediately. Sweat is your enemy; once you’re wet, you’ll chill fast.
- Use natural breaks: walk back to the car to check forecasts, then return to your spot.
The goal: stay “slightly active” so your body produces enough heat, without getting out of breath or damp.
Make your waiting time comfortable, not just bearable
Being physically warm is only half the battle. The other half is mental: boredom, frustration and “nothing is happening” syndrome. Those push people back to town as much as cold toes do.
A few simple tweaks help a lot:
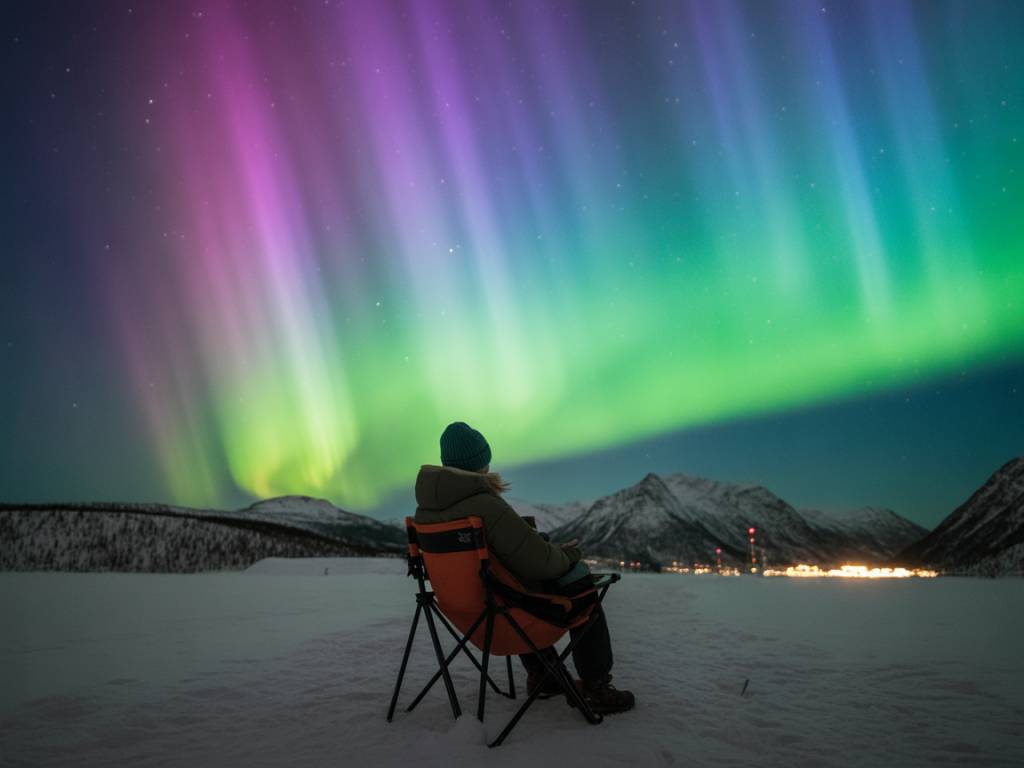
- Bring a simple seat:
- A folding camping chair or a small foldable stool is enough.
- Put a blanket or foam pad on the seat if it’s metal or thin.
- Sitting a bit higher can make scanning the sky more relaxed.
- Protect your back from wind:
- Use the car, a small hill, or a line of trees as a windbreak.
- Even shifting 10 meters can make a massive difference in perceived temperature.
- Have something to “do” during quiet phases:
- Offline playlists or downloaded podcasts.
- A sky map app to identify stars and constellations while you wait.
- Camera practice: composition, focus on stars, trying different lenses.
Busy minds complain less about cold. Just make sure your distractions don’t stop you from checking the sky every few minutes; auroras can ramp up quite fast.
Safety basics when you stay out late near the city
Staying warm is important, staying safe is non-negotiable. When you’re watching auroras near an urban area, a few rules help prevent problems:
- Tell someone where you go:
- Send a quick message with your target area and expected return time.
- If you change spots significantly, update them.
- Keep your phone ready, but not frozen:
- Cold kills batteries fast; keep your phone in an inner pocket when not using it.
- A small power bank in a warm pocket can save your night.
- Headlamp or flashlight:
- Choose one with a red-light mode to preserve night vision.
- Use it briefly when moving around cars or uneven terrain.
- Traffic awareness:
- If you’re near roads, wear something reflective or use a small safety light.
- Don’t stand on road shoulders with your eyes glued to the sky; move away from traffic.
Comfort and safety go together: if you’re constantly worried about cars, slipping or your phone dying, you’ll enjoy the experience much less and probably leave earlier.
City-based “aurora kit” you can leave ready all season
To reduce stress and last-minute chaos, keep a small, permanent aurora kit in one bag near your door or in your car during the active season. It doesn’t need to be complex:
- Thermal base layer (top and bottom).
- Extra wool socks and liner gloves.
- Buff/neck gaiter and spare beanie.
- Hand and toe warmers (a couple of sets).
- Foam sit pad or foldable mat.
- Compact thermos (ready to fill before leaving).
- Headlamp with spare batteries.
- Basic power bank and cable.
- Snacks that can stay in the bag for weeks (nuts, bars, dried fruit).
With this kit ready, your “should I go or not?” decision becomes much easier. You only really need to check the forecast, fill the thermos and grab your outer layers.
Putting it all together on a real aurora night
Here’s how a typical city-adjacent aurora night can look when warmth and comfort are planned properly:
- Late afternoon:
- Check cloud and aurora forecasts and pick a 2–4 hour window.
- Decide on one primary spot and one backup, both reachable on winter roads.
- At home:
- Dress in full layering system, but keep mid layer and jacket partially open to avoid sweating while loading the car.
- Fill your thermos, grab your snack pack, charge your phone.
- On the way:
- Keep car warm but not tropical; you want to step out without a huge shock.
- Recheck cloud situation as you get closer to your spot.
- On site:
- Park with a decent view north and some protection from wind.
- Do a quick 5-minute walk-around to warm up and sense the temperature/wind.
- Set up camera and chair, place foam mat where you’ll stand or sit.
- During the night:
- Rotate: 20–30 minutes outside, 5–10 minutes in the car if needed.
- Small sips of hot drink and snacks every 30–45 minutes.
- Gentle movement whenever you feel the cold creeping in.
- End of session:
- Change into a dry shirt or socks in the car if needed, so you drive home warm.
- Mentally review what worked and what didn’t for your next outing.
After two or three nights like this, your routine becomes automatic. You spend less energy worrying about gear or cold, and more energy actually looking at the sky.
Staying warm buys you the most important thing: time
Auroras don’t follow our schedules. They fade when you’re ready and wake up when you’re tired. The main advantage you can give yourself near your city isn’t a new camera or a perfect KP forecast; it’s extra time outside in comfort.
With the right layers, a warm drink, a car used as a basecamp and a simple kit ready to grab, you turn long, cold, frustrating waits into calm, manageable sessions. That’s usually when the best displays happen – just after everyone else has already gone home.